First of all, download the UCI Java API from the starface website and expand it to a folder on your harddisk. Unfortunatly the log4j.jar is missing in the UCI Java API download. So you have to download the log4j.jar from http://www.apache.org/dyn/closer.cgi/logging/log4j/1.2.17/log4j-1.2.17.zip and copy the log4j.jar from this zip to the "starface-uci-proxy-java-2.2.0\lib" folder in the UCI Java API folder.
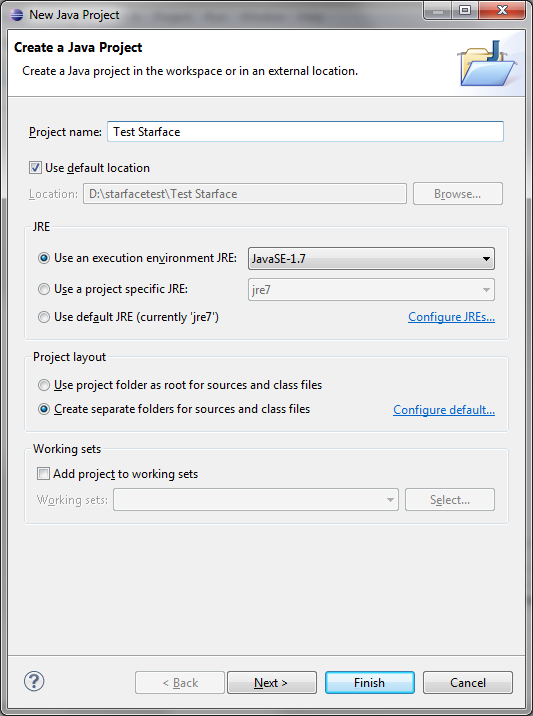
Create a new Java Project for your Tests in your Eclipse IDE.
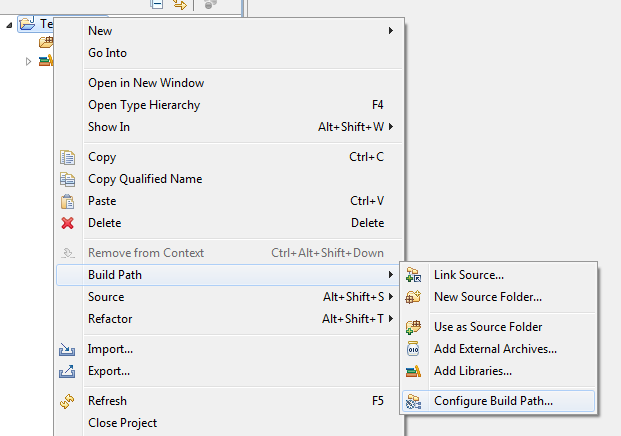
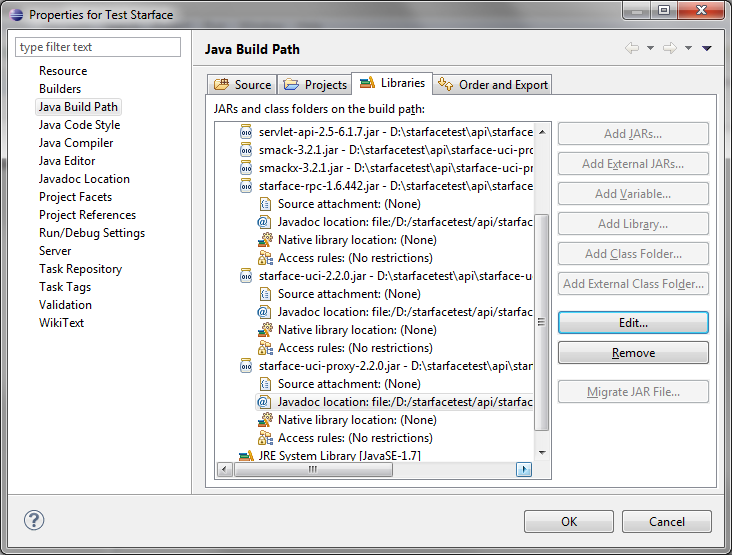
Right click your new Java project and select "Build path->Configure Build Path..."
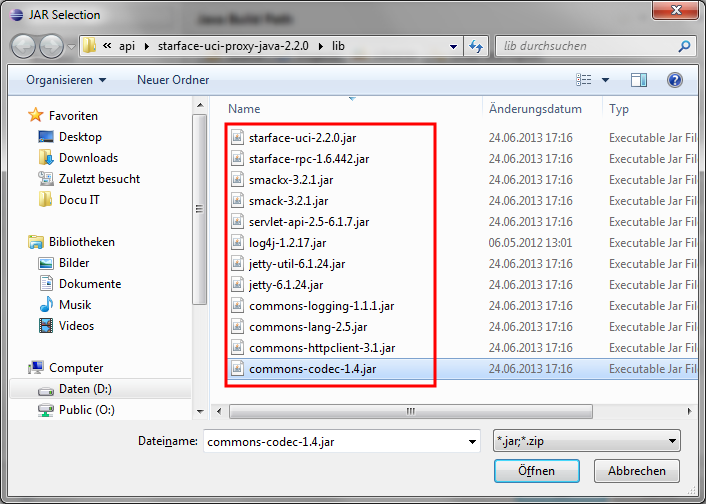
In the Build Path Configuration select the "Libraries" Tab and click the "Add External JARs..." Pushbutton.

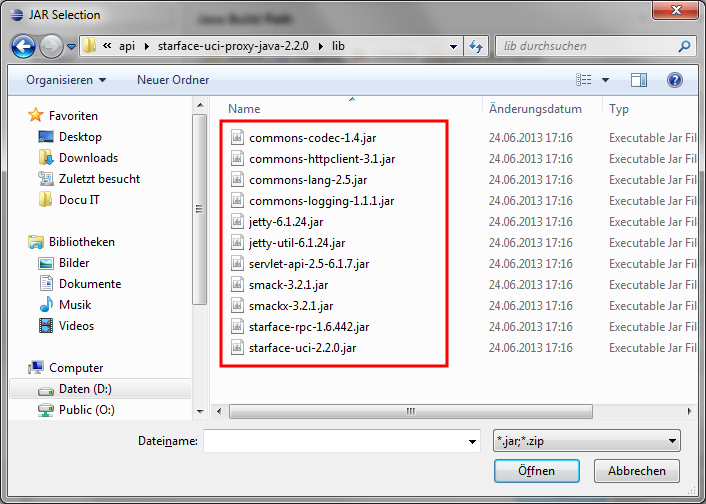
In the File selection dialog go to the directory where you have expanded the UCI Java API in Step 1 and add all jars in the "starface-uci-proxy-java-2.2.0\lib" folder to your build configuration.
As an optional but very recommended step you can add the javadoc of the API to your build configuration. To do so expand the "starface-rpc.*.jar", click the Javadoc location line and select Edit.
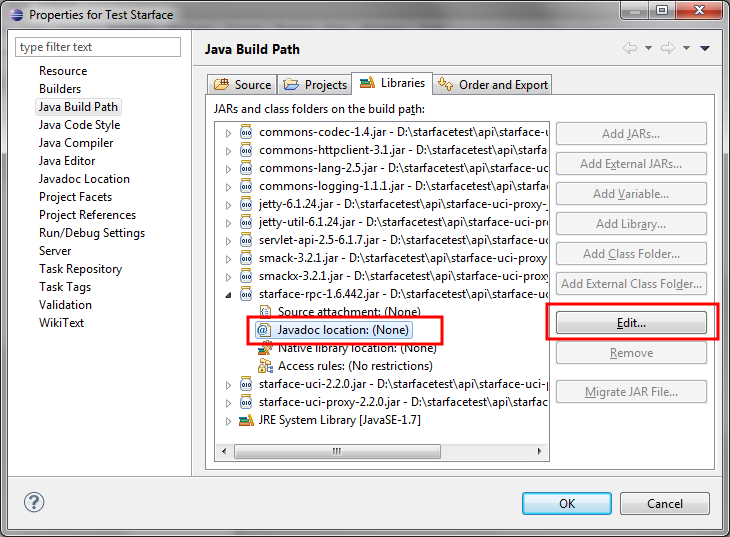
In the following Dialog select "Browse" and browse to the location of the "starface-uci-proxy-java-2.2.0\docs\starface-rpc" folder.
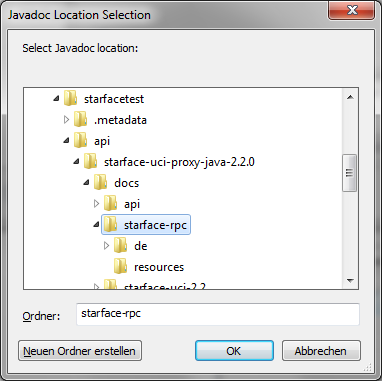
Repeat the steps to add the Java doc for starface-uci and starface-uci-proxy too.
Now your "Build path configuration" should look like this:
 public static void main(String[] args) {
  UciProxy proxy = null;
  try {
   UcpTransportFactory ucpTransportFactory = new HttpUcpTransportFactory(
     Inet4Address.getLocalHost().getHostAddress(), 8181,
     "starfacehost", 80, false, null, null);
   final UciProxyFactory uciProxyFactory = UciProxyFactory
     .createWithTransportFactory(ucpTransportFactory);
   UciProxy uciProxy = uciProxyFactory.createUciProxy("userID",
     "password");
   uciProxy.connect();
   proxy = uciProxy;

  } catch (UnknownHostException e) {
   e.printStackTrace();
  } catch (UcpConnectionFailedException e) {
   e.printStackTrace();
  } finally {
   if (proxy != null)
    proxy.disconnect();
  }
 }
You have to replace "starfacehost" "userID" and "password" with the correct values of your environment. When you run the programm you should see the following status message in the console view.
08:40:06,139 DEBUG openTransportAndAttach: Connecting to UCP server...
08:40:06,172 DEBUG Sending RPC request: ucp.v22.requests.connection.login() to http://starfacehost:80/xml-rpc?de.vertico.starface.auth=edb03a2ba7cca2c7b8100dfdedc83ba0&de.vertico.starface.user=userID&de.vertico.starface.callback.type=http&de.vertico.starface.callback.host=172.16.2.85&de.vertico.starface.callback.port=8181&de.vertico.starface.callback.path=/
08:40:06,234 DEBUG Incoming RPC return value: true from http://starfacehost:80/xml-rpc?de.vertico.starface.auth=edb03a2ba7cca2c7b8100dfdedc83ba0&de.vertico.starface.user=userID&de.vertico.starface.callback.type=http&de.vertico.starface.callback.host=172.16.2.85&de.vertico.starface.callback.port=8181&de.vertico.starface.callback.path=/
08:40:06,234 DEBUG Sending RPC request: ucp.v22.requests.service.subscribeEvents("ucp.v22.events.connection") to http://starfacehost:80/xml-rpc?de.vertico.starface.auth=edb03a2ba7cca2c7b8100dfdedc83ba0&de.vertico.starface.user=userID&de.vertico.starface.callback.type=http&de.vertico.starface.callback.host=172.16.2.85&de.vertico.starface.callback.port=8181&de.vertico.starface.callback.path=/
08:40:06,234 DEBUG Incoming RPC return value: true from http://starfacehost:80/xml-rpc?de.vertico.starface.auth=edb03a2ba7cca2c7b8100dfdedc83ba0&de.vertico.starface.user=userID&de.vertico.starface.callback.type=http&de.vertico.starface.callback.host=172.16.2.85&de.vertico.starface.callback.port=8181&de.vertico.starface.callback.path=/
08:40:06,234 INFO shutdown: RPC server is currently not running.
2013-06-25 08:40:06.250:INFO::Logging to STDERR via org.mortbay.log.StdErrLog
2013-06-25 08:40:06.282:INFO::jetty-6.1.24
2013-06-25 08:40:06.297:INFO::Started SocketConnector@0.0.0.0:8181
08:40:06,297 DEBUG Registered RpcMethod [name=ucp.v22.events.connection.reset, method=public abstract void de.starface.integration.uci.java.v22.ucp.messages.events.UcpConnectionEvents.reset(), requiredAuthType=null, object=RpcObject [rpcInterface=interface de.starface.integration.uci.java.v22.ucp.messages.events.UcpConnectionEvents, namePrefix=null, requiredAuthType=class de.starface.integration.uci.v22.client.transport.http.LoginUrlAuthToken, name=ucp.v22.events.connection]]
08:40:06,297 DEBUG Successfully registered RpcObject [rpcInterface=interface de.starface.integration.uci.java.v22.ucp.messages.events.UcpConnectionEvents, namePrefix=null, requiredAuthType=class de.starface.integration.uci.v22.client.transport.http.LoginUrlAuthToken, name=ucp.v22.events.connection]
08:40:06,297 DEBUG openTransportAndAttach: Connecting to UCP server...
08:40:06,297 INFO onConnectionEstablished: Connection to UCP server successfully initialized.
08:40:06,297 DEBUG startReconnectTimer: Activating reconnect timer.
08:40:06,297 DEBUG resubscribeAllEvents: Resubscribing all UCP events...
08:40:06,297 DEBUG resubscribeAllEvents: Finished resubscribing events.
08:40:06,297 INFO onConnectionEstablished: Connection to UCP server successfully initialized.
08:40:06,297 DEBUG stopReconnectTimer: Deactivating reconnect timer.
08:40:06,297 DEBUG closeTransportAndDetach: Disconnecting from UCP server...
08:40:06,297 DEBUG Sending RPC request: ucp.v22.requests.connection.logout() to http://starfacehost:80/xml-rpc?de.vertico.starface.auth=edb03a2ba7cca2c7b8100dfdedc83ba0&de.vertico.starface.user=userID&de.vertico.starface.callback.type=http&de.vertico.starface.callback.host=172.16.2.85&de.vertico.starface.callback.port=8181&de.vertico.starface.callback.path=/
08:40:06,297 DEBUG Incoming RPC return value: true from http://starfacehost:80/xml-rpc?de.vertico.starface.auth=edb03a2ba7cca2c7b8100dfdedc83ba0&de.vertico.starface.user=userID&de.vertico.starface.callback.type=http&de.vertico.starface.callback.host=172.16.2.85&de.vertico.starface.callback.port=8181&de.vertico.starface.callback.path=/
08:40:06,297 DEBUG shutdown: Shutting down RPC server...
2013-06-25 08:40:06.297:INFO::Stopped SocketConnector@0.0.0.0:8181
08:40:06,407 DEBUG shutdown: RPC server shut down.
08:40:06,407 INFO closeTransportAndDetach: Successfully disconected from UCP server.
08:40:06,407 INFO shutdown: RPC server is currently not running.