The roaming feature of the notes client works really well and i always recommend to use roaming on production systems, but there is one caveat, if you change the notes id of the client when roaming is enabled, you will get all sort of weird problems. So NEVER change the notes id while roaming is enabled on your client. Normally changing the id in the client is not necessary, but when i test readers field functionality i want a quick way to change the id without logout and relogin of my windows session.
Fortunately with Notes 8.5.2 IBM introduced a Notes.ini setting with which one can disable roaming temporarily. So if you have the same usecase as i, add "DisableRoaming=1" to your notes.ini before you change the notes id to the id of another user. After you finish your testing, you can re enable roaming with "DisableRoaming=0" in the notes.ini.
You can find all details how this great feature works in the technote Disabling and re-enabling Notes roaming user status on the fly.
Wednesday, June 18, 2014
Improve backup performance of IFS objects (DAOS) on the IBM i with BRMS
One of the disadvantages of DAOS is, that your backup job has to backup many relative small files, which can be a little bit slow on the IBM i. Fortunately IBM has provided some PTF's to improve this situation in the last years.
The biggest improvement can be achieved with the "ASYNCBRING" parameter on the "SAV" command which gets you up to 60 % faster backups of IFS objects. You can find the PTF's needed for V6R1 and V7R1 in the ASYNCBRING Enablement - IFS SAV Performance at V6R1Mx and V7R1M0 technote. In V7R2 the support is available in the base operating system.
To use the ASYNCBRING Support in BRMS (Backup Recovery and Media Service) you need to follow the steps described in the Overriding the ASYNCBRING parameter on IFS saves to improve performance technote.
Tuesday, June 17, 2014
Ich bin doch nicht blöd!
Nun haben wir es amtlich, die 2 Großen Media Markt und Saturn geben nur vor für den Kunden das beste zu wollen, aber in Wirklichkeit mauscheln sie gemeinsam mit den Lieferanten aus, wie Sie uns am besten übers Ohr hauen können. Die Kartellstrafe, die das österreichische Kartellamt verhängt hat ist zwar ein Anfang aber meiner Meinung nach noch weit zu niedrig.
Eigentlich ist zwar der Mediamarkt für mich historisch eher positiv besetzt, bot doch der Media Markt als einer der ersten in Österreich eine Riesenauswahl zu damals (vor ca. 25 Jahren) attraktiven Preisen. Da haben die Elektriker bei denen man bis dahin Unterhaltungselektronik kaufen konnte ziemlich alt ausgesehen. Mittlerweile ist es aber so, dass man Massenartikel im Internet bestellt und beratungsintensive Artikel wie Fernseher oder Heimkinosystem lieber beim Fachhändler kauft.
Bericht im Standard
Bericht auf Heise
How to configure Eclipse 4.3 to develop plugins for Notes 9.0.1 FP1 (Part 2)
In the second part of this series i will show how to create a launch configuration in Eclipse to run or debug Notes. In the launch configuration you can select which of your self developed plugins should be deployed to the launched Notes client. So you do not need features, an updatesite and widgets for your development. This allows rapid development. Before you start to create the launch configuration be sure that you have followed all steps from the first part of this series.
Open the "Run Configurations" Dialog from the drop down menu.
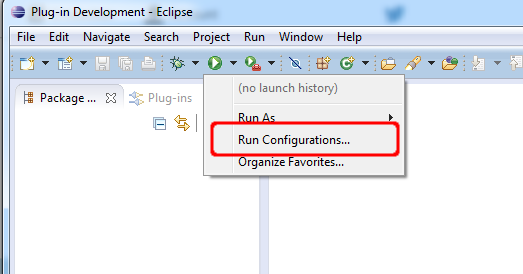
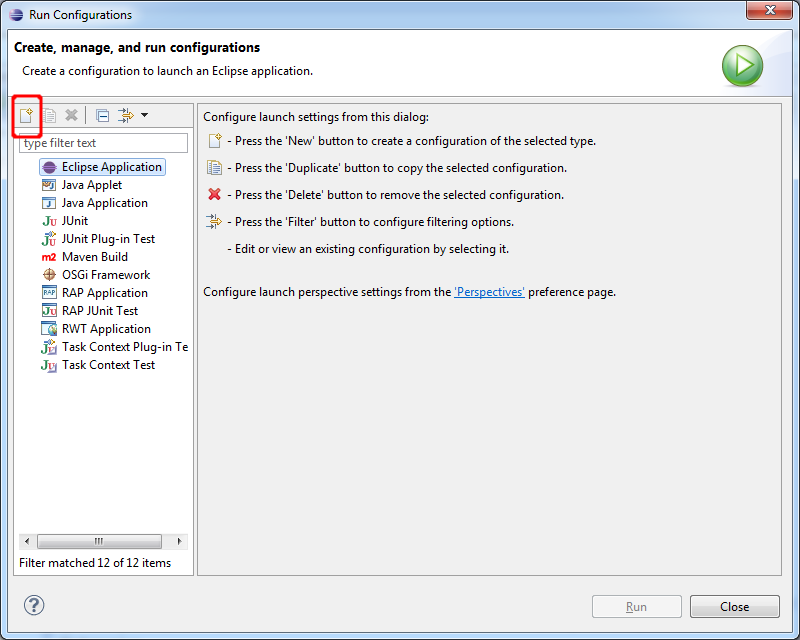
Select "Eclipse Application in the right sidebar and click the "New" Button.
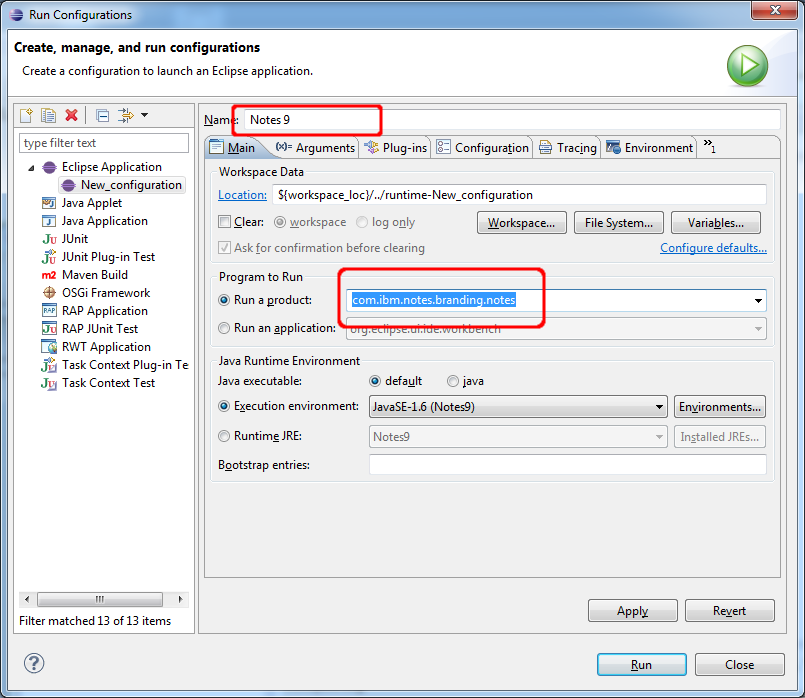
Change the Name of your newly created launch configuration to "Notes 9". Select "Run as a product" and choose "com.ibm.notes.branding.notes". Be sure that the Execution environment is the Notes JRE you defined in the first part of my tutorial.
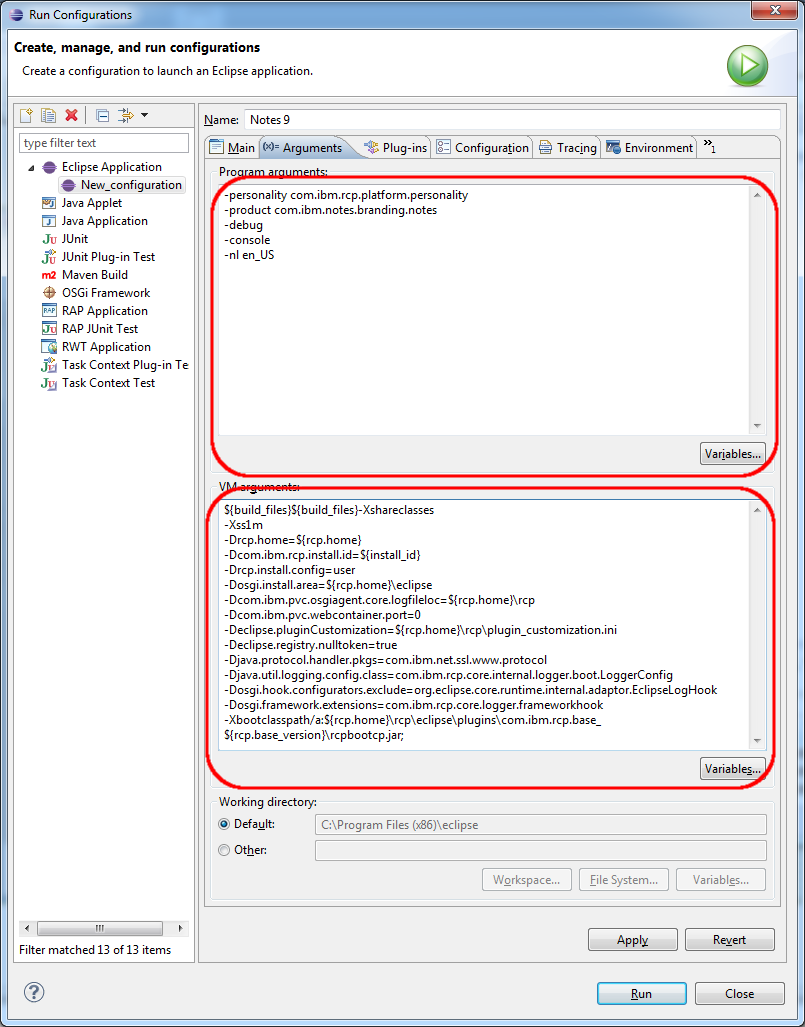
Go to the second tab "Arguments" and fill in the program arguments:
-personality com.ibm.rcp.platform.personality
-product com.ibm.notes.branding.notes
-debug
-console
-nl en_US
and the VM arguments:
${build_files}-Xshareclasses
-Xss1m
-Drcp.home=${rcp.home}
-Dcom.ibm.rcp.install.id=${install_id}
-Drcp.install.config=user
-Dosgi.install.area=${rcp.home}\eclipse
-Dcom.ibm.pvc.osgiagent.core.logfileloc=${rcp.home}\rcp
-Dcom.ibm.pvc.webcontainer.port=0
-Declipse.pluginCustomization=${rcp.home}\rcp\plugin_customization.ini
-Declipse.registry.nulltoken=true
-Djava.protocol.handler.pkgs=com.ibm.net.ssl.www.protocol
-Djava.util.logging.config.class=com.ibm.rcp.core.internal.logger.boot.LoggerConfig
-Dosgi.hook.configurators.exclude=org.eclipse.core.runtime.internal.adaptor.EclipseLogHook
-Dosgi.framework.extensions=com.ibm.rcp.core.logger.frameworkhook
-Xbootclasspath/a:${rcp.home}\rcp\eclipse\plugins\com.ibm.rcp.base_${rcp.base_version}\rcpbootcp.jar;
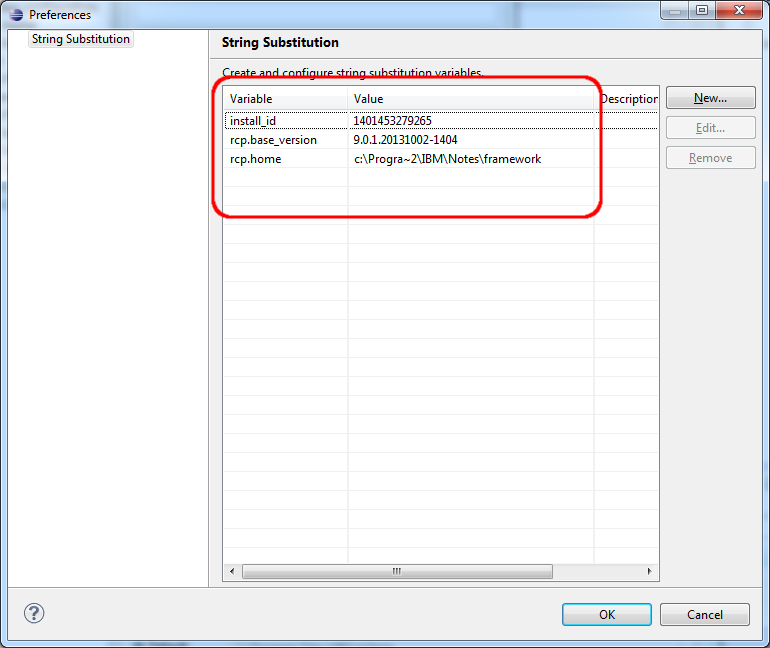
Then click on the "Variables" button and then on the "Edit Variables" Button to define the Variables we have used in the VM arguments.
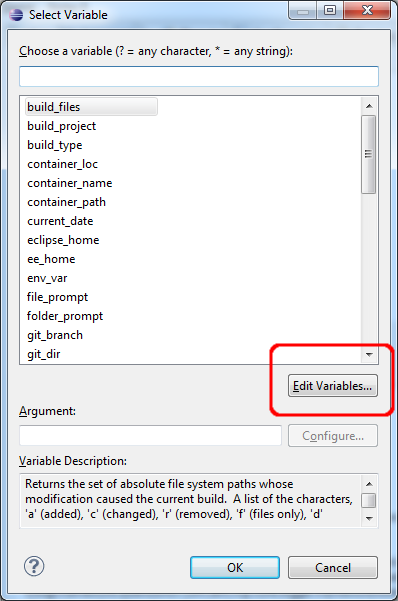
You can create the variables with the "New" button.
install_id=1401453279265
rcp.base_version=9.0.1.20131002-1404
rcp.home=C:\Progra~2\IBM\Notes\framework
You have to adapt the rcp.home path with your notes path. But be careful that there are no blanks in the path. As you see in my example i have used the 8.3 format to avoid the blanks in C:\Programme (x86)".
Click "Ok" to leave the String Substitution dialog.
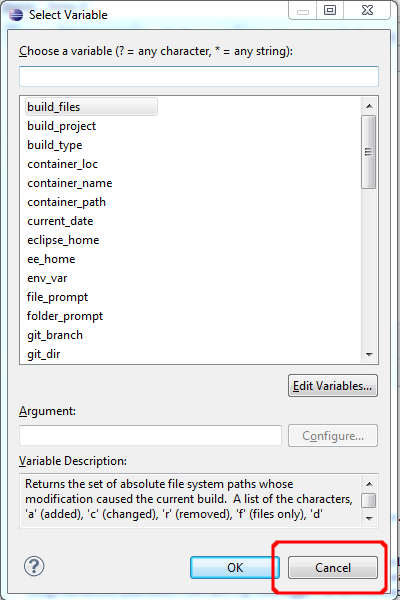
Attention: Close the "Select Variable" Dialog with "Cancel" and not with "Ok". When you select "Ok", the selected variable will be inserted in the VM Arguments and your launch config will not work.
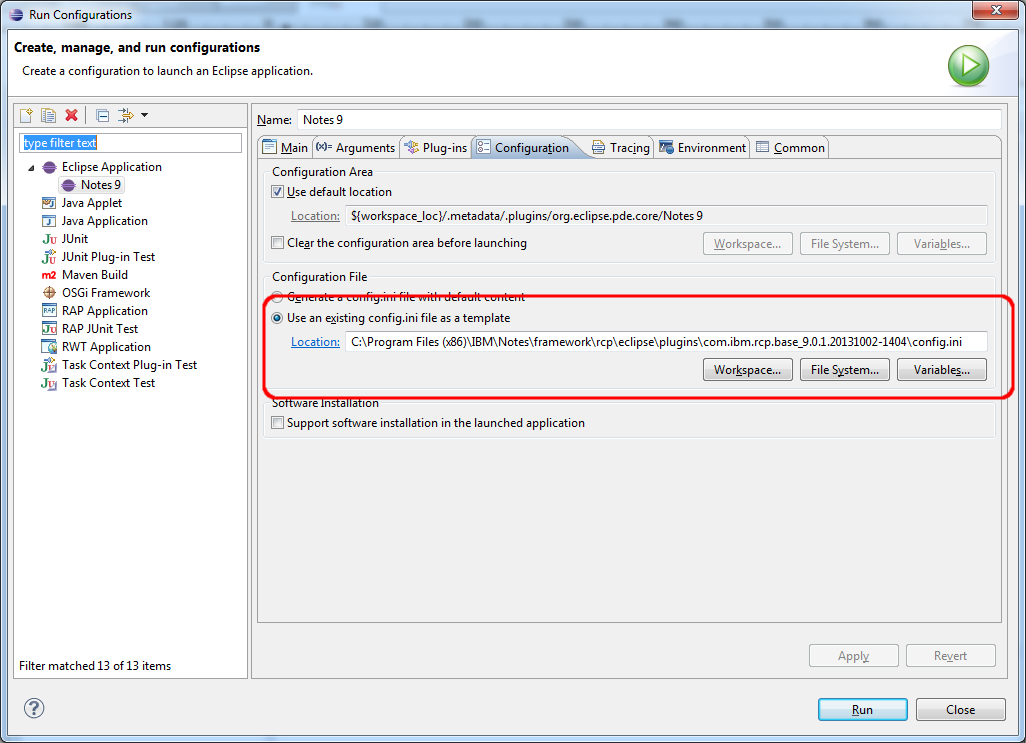
 Go to the "Configuration" tab and choose "Use an existing config file as a template". You can find the config.ini of your Notes installation in \framework\rcp\eclipse\plugins\com.ibm.rcp.base_9.0.1.20131002-1404\ in the Notes program directory.
After applying your changes with the "Apply" button you can start notes with the launch button. Be sure that Notes is not already running, because the start of notes will fail if it is already running. All plugins in your workspace will be auto deployed to the launched Notes client. Leave a comment if it is not working for you.
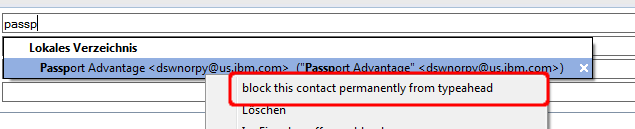
You are now ready to start extending the Notes client with your own extensions. In one of my next posts i will show how to write a plugin to block recent contacts permanently directly from the typeahaed function.
Open the "Run Configurations" Dialog from the drop down menu.
Select "Eclipse Application in the right sidebar and click the "New" Button.
Change the Name of your newly created launch configuration to "Notes 9". Select "Run as a product" and choose "com.ibm.notes.branding.notes". Be sure that the Execution environment is the Notes JRE you defined in the first part of my tutorial.
Go to the second tab "Arguments" and fill in the program arguments:
-personality com.ibm.rcp.platform.personality
-product com.ibm.notes.branding.notes
-debug
-console
-nl en_US
and the VM arguments:
${build_files}-Xshareclasses
-Xss1m
-Drcp.home=${rcp.home}
-Dcom.ibm.rcp.install.id=${install_id}
-Drcp.install.config=user
-Dosgi.install.area=${rcp.home}\eclipse
-Dcom.ibm.pvc.osgiagent.core.logfileloc=${rcp.home}\rcp
-Dcom.ibm.pvc.webcontainer.port=0
-Declipse.pluginCustomization=${rcp.home}\rcp\plugin_customization.ini
-Declipse.registry.nulltoken=true
-Djava.protocol.handler.pkgs=com.ibm.net.ssl.www.protocol
-Djava.util.logging.config.class=com.ibm.rcp.core.internal.logger.boot.LoggerConfig
-Dosgi.hook.configurators.exclude=org.eclipse.core.runtime.internal.adaptor.EclipseLogHook
-Dosgi.framework.extensions=com.ibm.rcp.core.logger.frameworkhook
-Xbootclasspath/a:${rcp.home}\rcp\eclipse\plugins\com.ibm.rcp.base_${rcp.base_version}\rcpbootcp.jar;
Then click on the "Variables" button and then on the "Edit Variables" Button to define the Variables we have used in the VM arguments.
You can create the variables with the "New" button.
install_id=1401453279265
rcp.base_version=9.0.1.20131002-1404
rcp.home=C:\Progra~2\IBM\Notes\framework
You have to adapt the rcp.home path with your notes path. But be careful that there are no blanks in the path. As you see in my example i have used the 8.3 format to avoid the blanks in C:\Programme (x86)".
Click "Ok" to leave the String Substitution dialog.
Attention: Close the "Select Variable" Dialog with "Cancel" and not with "Ok". When you select "Ok", the selected variable will be inserted in the VM Arguments and your launch config will not work.
After applying your changes with the "Apply" button you can start notes with the launch button. Be sure that Notes is not already running, because the start of notes will fail if it is already running. All plugins in your workspace will be auto deployed to the launched Notes client. Leave a comment if it is not working for you.
You are now ready to start extending the Notes client with your own extensions. In one of my next posts i will show how to write a plugin to block recent contacts permanently directly from the typeahaed function.
Sunday, June 15, 2014
Wow Uncharted 4 will look good on the Playstation 4
The Naughty dogs games like Uncharted 1-3 were the graphic reference on the playstation 3 and now Sony has presented the first trailer of Uncharted 4 on the Playstation 4. This trailer looks fantastic and shows ingame graphics running on the PS 4. I am looking forward at this game and will order my PS 4 as soon as this game will be available.
How to configure Eclipse 4.3 to develop plugins for Notes 9.0.1 FP1 (Part 1)
Our Domino Admin has updated our Notes/Domino servers to Domino 9.0.1 FP1. So i have to update my plugin development environment to 9.0.1 FP1 too. In today's post i want to show what's to change in the eclipse preferences to extend the Notes client with your own functionality. I assume that you have already installed Eclipse 4.3 or above and Notes 9.0.1 FP1.
Start your Eclipse and choose a new workspace for your first steps in Notes plugin development.
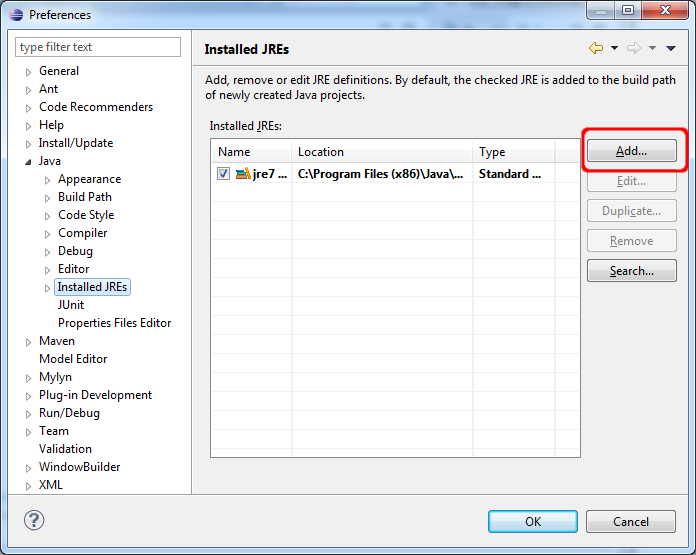
Open the Eclipse preferences window and select "Java->Installed JREs" from the selection tree. Click "Add" to add the Notes JRE to the installed JRE's Notes will only run with his own JRE.
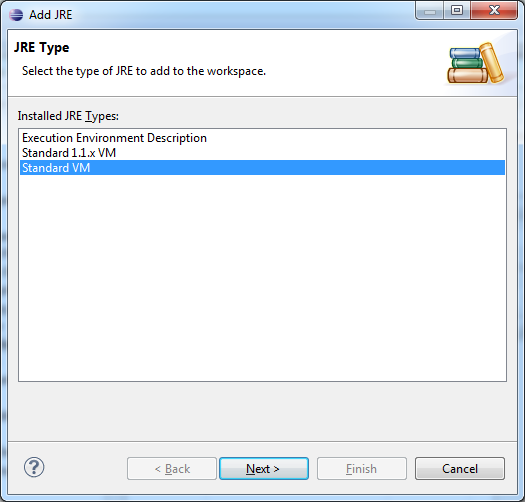
Select Standard VM as the JRE type.
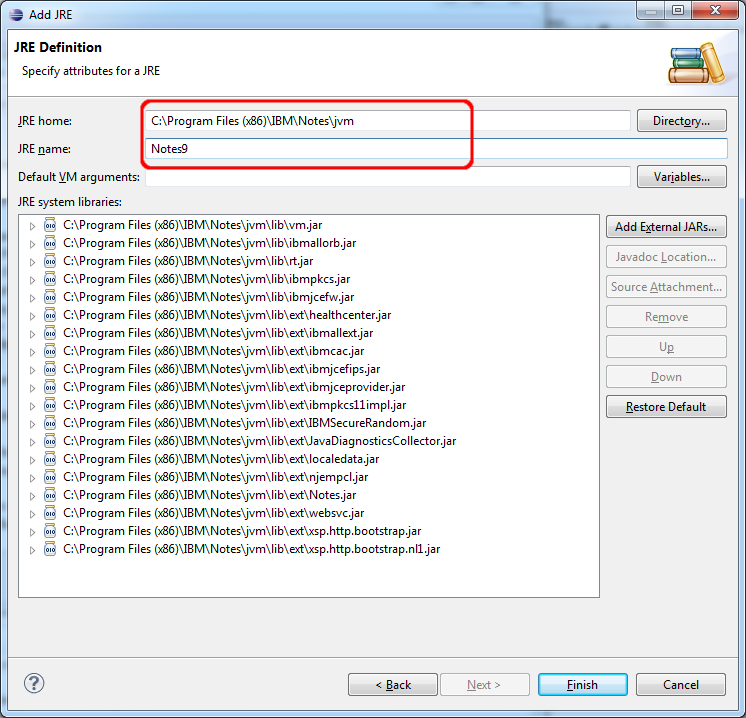
Choose the base folder of the Notes JRE and Name the new JRE "Notes9". The JRE of Notes is in the jvm folder in your Notes Base directory. The JRE system libraries are added automatically when you choose the JRE home directory. Click Finish.
Check the new JRE to make your newly added JRE the default JRE.
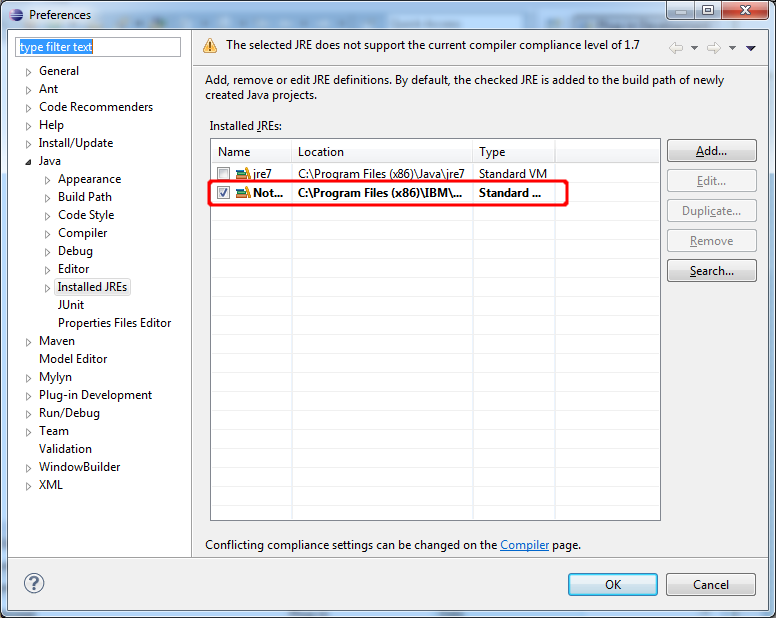
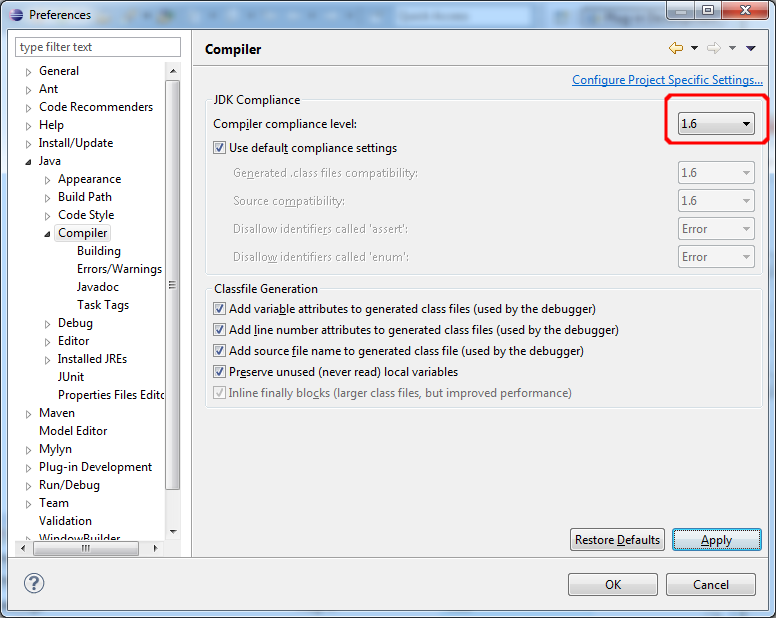
To solve the warning that the compiler compliance settings are not correct for this JRE, go to "Java->Compiler" and change the JDK Compliance from 1.7 to 1.6.
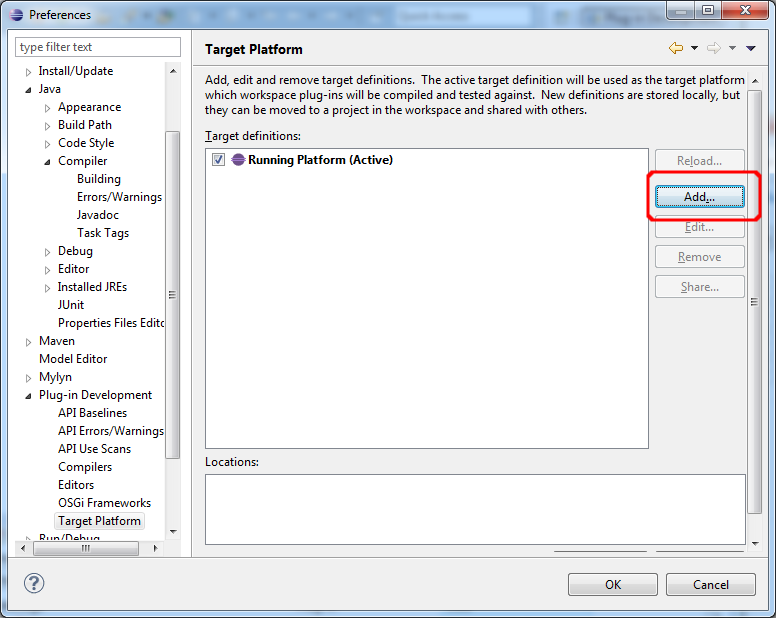
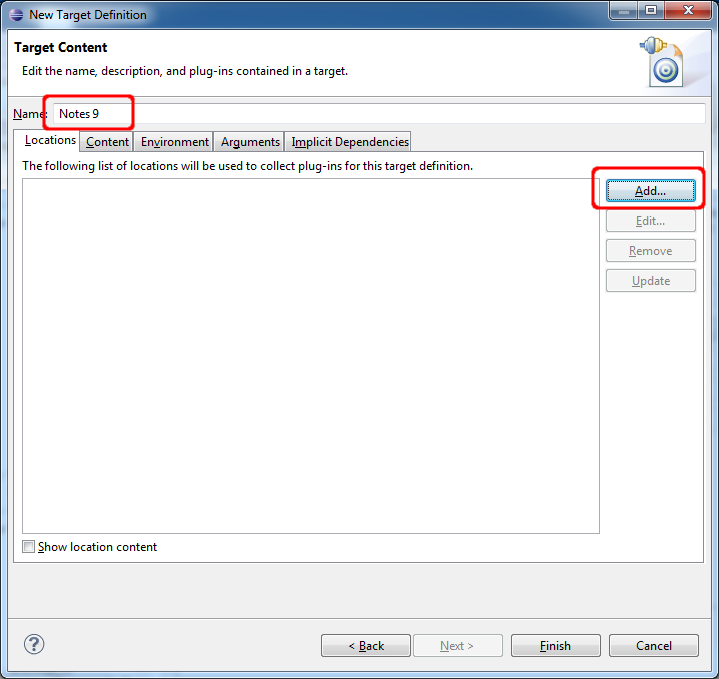
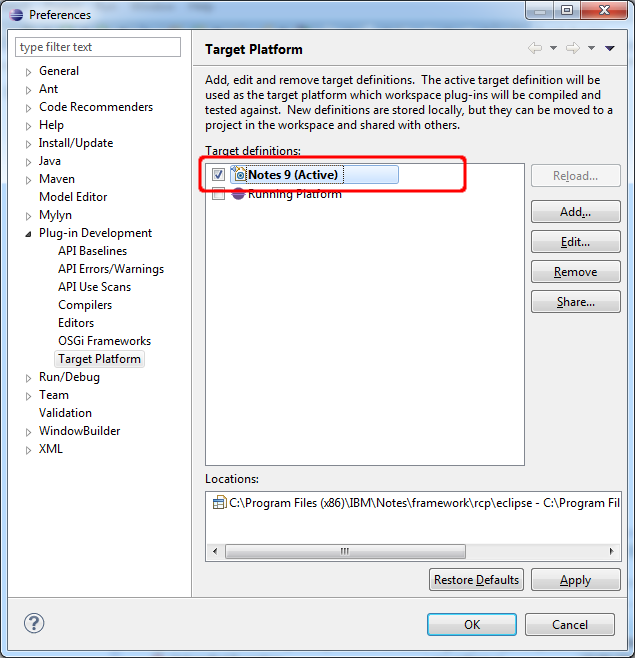
Now we need to add Notes as a target platform. The target platform tells Eclipse which plugins you can use or extend for your development. Click add to start the process.
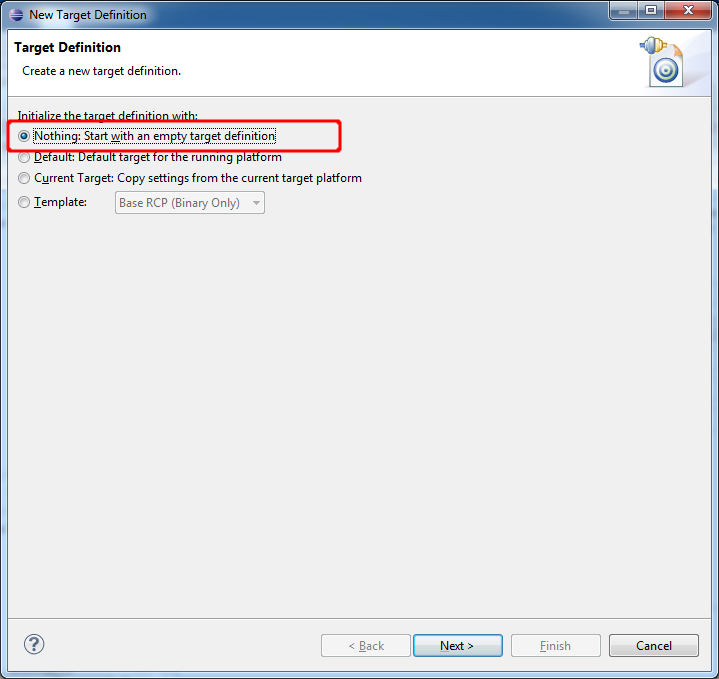
Start with and empty target definition and click next.
Name your new target definition "Notes 9" and click add to add a new plugin location to your definition.
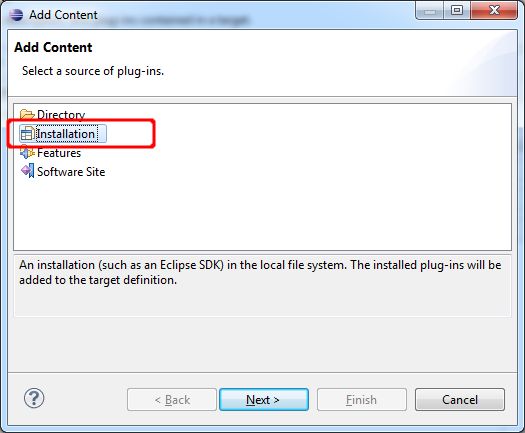
Select that you want to add an installation and click next.
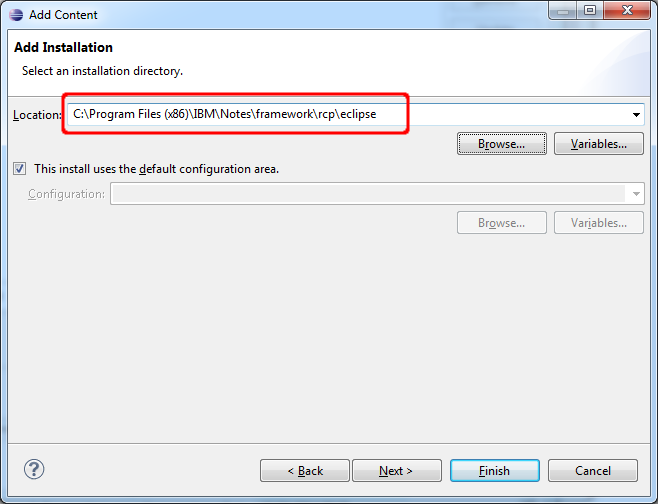
Add the "framework\rcp\eclipse" path in your Notes program directory to the location. and click "Finish"
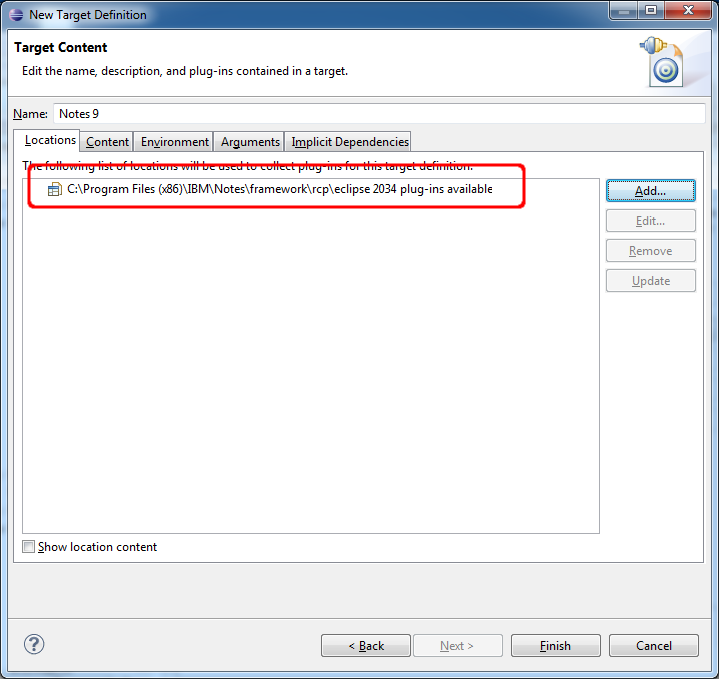
Approximately 2034 plugins (Notes client, Designer) should have been added to your definition.Click finish.
Change the target patform to the newly created definition and close the Preferences Dialog with "OK"
Your Eclipse workspace is now ready to develop plugins for the Notes client. In the next post in this series i will show you how to create a run config to start the Notes client from inside of eclipse to easily debug your plugins.
Do not miss Part 2 of this series.
Start your Eclipse and choose a new workspace for your first steps in Notes plugin development.
Open the Eclipse preferences window and select "Java->Installed JREs" from the selection tree. Click "Add" to add the Notes JRE to the installed JRE's Notes will only run with his own JRE.
Select Standard VM as the JRE type.
Choose the base folder of the Notes JRE and Name the new JRE "Notes9". The JRE of Notes is in the jvm folder in your Notes Base directory. The JRE system libraries are added automatically when you choose the JRE home directory. Click Finish.
Check the new JRE to make your newly added JRE the default JRE.
To solve the warning that the compiler compliance settings are not correct for this JRE, go to "Java->Compiler" and change the JDK Compliance from 1.7 to 1.6.
Now we need to add Notes as a target platform. The target platform tells Eclipse which plugins you can use or extend for your development. Click add to start the process.
Start with and empty target definition and click next.
Name your new target definition "Notes 9" and click add to add a new plugin location to your definition.
Select that you want to add an installation and click next.
Add the "framework\rcp\eclipse" path in your Notes program directory to the location. and click "Finish"
Approximately 2034 plugins (Notes client, Designer) should have been added to your definition.Click finish.
Change the target patform to the newly created definition and close the Preferences Dialog with "OK"
Your Eclipse workspace is now ready to develop plugins for the Notes client. In the next post in this series i will show you how to create a run config to start the Notes client from inside of eclipse to easily debug your plugins.
Do not miss Part 2 of this series.
Kindle Paperwhite 3G und Kindle Fire HD 32 GB nur heute und morgen um jeweils 99 EUR.
Heute ab 10 Uhr hat Amazon wieder einmal eine seiner Aktionen. Der Paperwhite 3G und der Kindle Fire HD 32 GB werden jeweils um 99 EUR verkauft. Beim Paperwhite beträgt der Rabatt 80 EUR und beim Kindle Fire HD sogar unglaubliche 130 EUR. Bei beiden Modellen handelt es sich zwar um das Vorgängermodell, aber trotzdem kann sich die Ausstattung für diesen Preis sehen lassen.

Der Paperwhite ist meiner Meinung nach sowieso die Referenz bei den e-book Readern. Wer einmal dieses e-ink Display das auch in der prallen Sonne im Gegensatz zu normalen Tablets bestens lesbar ist, weiß das es für das Lesevergnügen im Urlaub einfach nichts besseres gibt. kaufen....
Mit dem Kindle Fire HD hat man das ideale Einsteigertablet für den Medienkonsum das optimal mit den vielen Medienangeboten von Amazon zusammenspielt. Das Display und die allgemeine Qualität ist für den Preis exzellent. Auch die 32 GB Hauptspeicher sind in dieser Preisklasse absolut ungewöhnlich. Also wer ein Tablet zum Lesen, Video, Musik und Bilder schauen sucht, ist mit diesem bestens bedient. Beim Angebot von Apps muß man aber Abstriche machen, da die Kindle Fire nicht über den Playstore verfügen. Die wichtigsten Apps sind aber auch im Amazon Appstore vorhanden. Der Amazon Appstore bietet auch oft kostenpflichtige Apps gratis an. Ebenfalls sehr gut geeignet ist das Tablet als Controller für ein Sonossystem. Sicher die günstigste Methode einen Sonos Controller zu bekommen. kaufen...
Der Paperwhite ist meiner Meinung nach sowieso die Referenz bei den e-book Readern. Wer einmal dieses e-ink Display das auch in der prallen Sonne im Gegensatz zu normalen Tablets bestens lesbar ist, weiß das es für das Lesevergnügen im Urlaub einfach nichts besseres gibt. kaufen....
 |
| jetzt nur 99 EUR |
 |
| jetzt nur 99 EUR |
Saturday, June 14, 2014
IBM announced a Power 8 iron for the P05 Software tier.
The Power 8 systems announced in early may had only machines with Software tier P10 and P20, but not with the entry software tier P05. The P05 software tier is priced very attractive and so this is the natural choice for many smaller IBM i customers. So i had asked Steve Will on Twitter whether there will be no P05 with Power 8 and he told me that the P05 machine will come later this year.
With the June announcement IBM has now officially announced this 4 core P05 machine.
4-Core Processor Feature
For clients that need fewer than six or eight processor cores in the single-socket
IBM Power System S814 server, a new 4-Core 3.02 GHz POWER8 Processor Card
(#EPXK) is available. There is no upgrade to increase the cores on this feature. This
server supports AIX, IBM i, and Linux, but is especially attractive to IBM i clients
with its P05 software tier. It is designed to meet many entry client requirements with
its 64 GB memory maximum, eight SAS drives in its system unit maximum, and
seven PCIe slots maximum. The IBM i Solution Edition (#4928) and Capacity Backup
option for IBM i (#0444) are supported.
This machine equipped with 4 activated cores, 4 387 GB SAS SSD drives, 4 big slow drives for cold data and 64 GB main storage is an absolute price/performance winner. We have a similar config at our site with 200 heavy ERP User and response times under 0.1 sec.
Subscribe to:
Posts (Atom)
ad