Open your plugin.xml with a double click. Go to the "Dependencies" tab and select "Add" to add a dependency.

Search for "com.ibm.rcp.ui" and select it to add it to your dependencies. You can only use functionality from the target platform for which you have created a dependency. Dependencies are a very powerful concept of the eclipse platform.

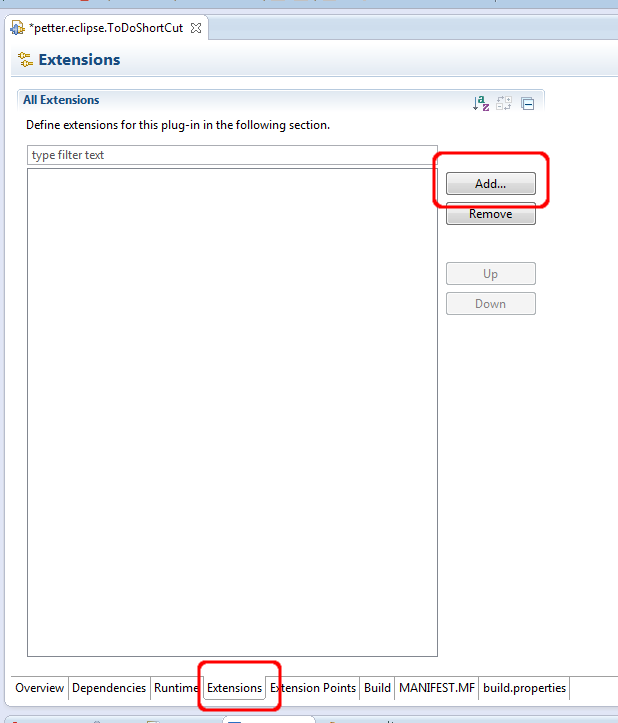
Next go to the "Extensions" tab in the plugin.xml and click "Add" to add your extension to the "ShortcutButtonSet" extension point in the "com.ibm.rcp.ui" plugin. Extension points and extensions are the mechanism which allows eclipse plugins to add functionality to existing plugins without the need to change them. If you want to know more you can find detailed information's about this topic in a very nice tutorial from Lars Vogel.
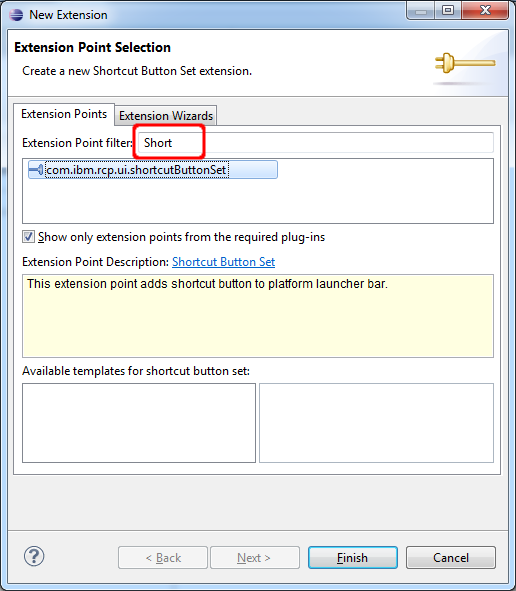
Search for the "ShortcutButtonSet" extension point and select finish to add it to your plugin.xml
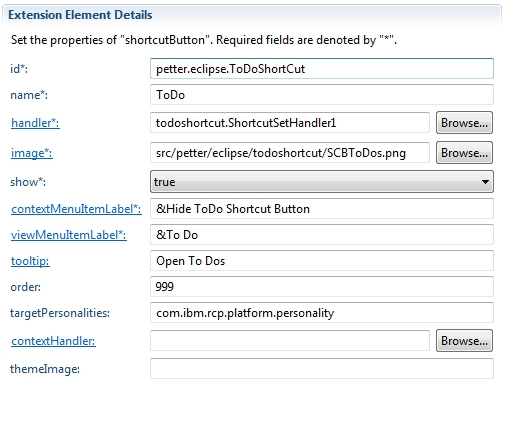
The shortcutButtonSet extension point have many values which can customize the functionality of your custom button.
Id: The unique id of your extension.
Name: The name of your extension.
Handler: This is the java class which will be called when a user clicks your icon in the masthead. We will create this class in the next step.
Image: Select the image you have imported to the plugin in the first part of the tutorial.
Show: If you select true, your icon will be visible by default in the Masthead and the user can hide it with a context action, otherwise the icon will be invisible and the user have to activate the icon in the view menu.
ContextMenuItemLabel: Label of the context action to hide the icon in the masthead.
ViewMenuItemLabel: Label of this extension in the view-> Show Shortcut Buttons menu.
Tooltip: The tooltip which should be shown when the user put the mouse over the icon.
Order: With this value you can control the position of your icon in the Masthead.
targetPersonalities: This controls in which personality of Expeditor your icon should be visible. Normally this should be always "com.ibm.rcp.platform.personality"
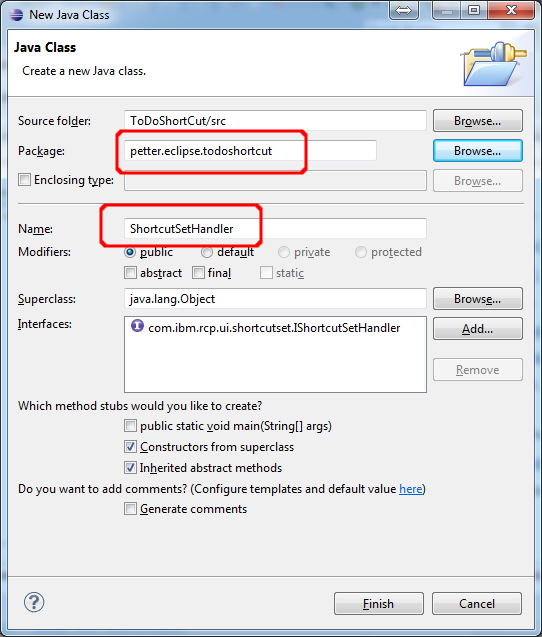
The class is pretty simple and have only an open method in which you check if your icon id has been clicked and if yes do what ever your action should do. In our example we want to open the ToDo Frameset of the mail database.
public class ShortcutSetHandler implements IShortcutSetHandler {
 /**
  * This method will be called, when the user clicks on your
  * ShortcutButtonSet Icon. arg1 contains the id of the clicked icon. So one
  * Handler class can manage several different Icons.
  */
 @Override
 public void open(int arg0, String arg1) {
  // When ToDoShortcut is clicked open the Todo Framset
  if ("petter.eclipse.ToDoShortCut".equals(arg1)) {
   Program.launch("Notes:///0000000000000E00/ToDoFS?OpenFrameset");
  }
 }
}
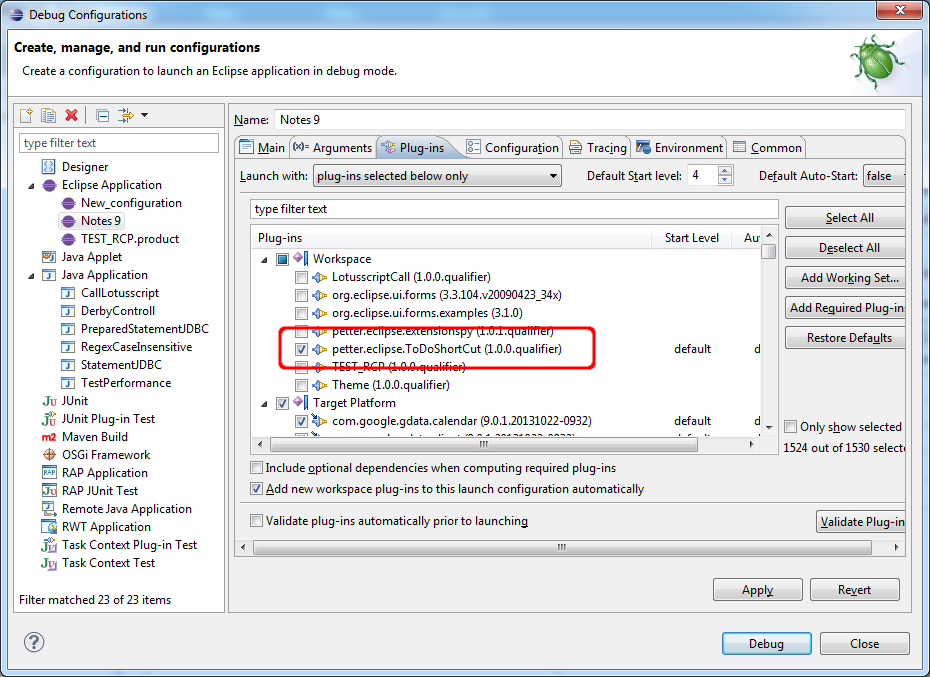
Save the code and the plugin.xlm and start the notes client from eclipse. Be sure that your newly created plugin is selected in the launch configuration.
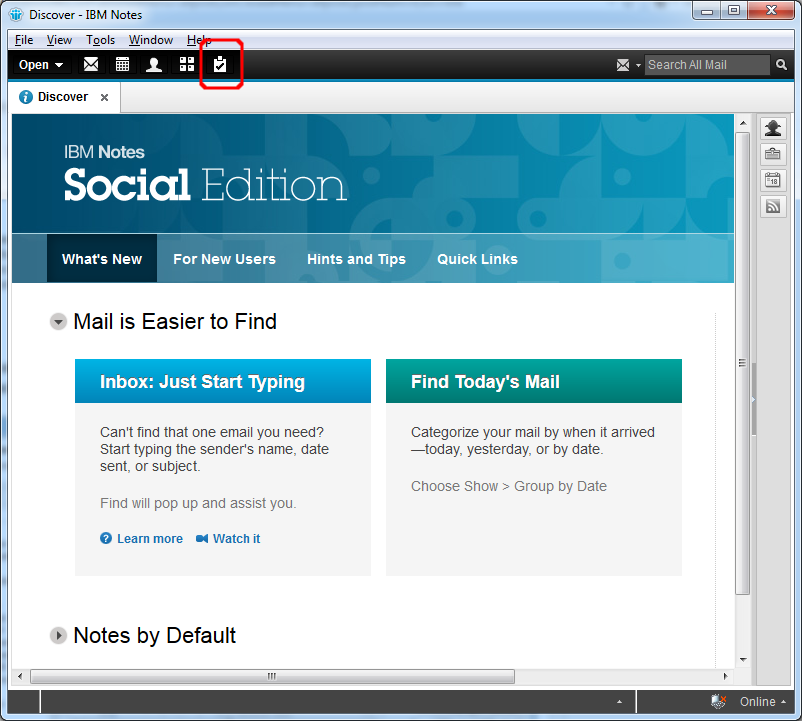
After Notes has been started you should see your new Action in the masthead.
If you want do add more actions to the masthead you can create one plugin for every action, or you can add additional actions to this plugin. In one of my next blog posts i will show you how to create feature, an update site and a widget for this plugin so that you can deploy your extensions to the masthead to your notes clients.
If you have problems with this tutorial, feel free to ask your questions in the comment section.
It's great to see these Notes Client Plugin tutorials, thanks a lot Ralf!
ReplyDeleteLast time I developed Java it was when 1.3.1 was new and shiny so I'm a little out of date. I followed these two posts and the two to set up eclipse for plugin in development and I hit a problem compiling the ShortcutSetHandler class as it couldn't find "Program.launch". Some Googling lead me to think this referred to org.eclipse.swt.program.Program. Yet more Googling lead me to download the SWT project and add it as a dependency. I'm not sure if this is how you have your environment setup but it seems to work now.
ReplyDeleteOtherwise excellent post.
Hi Terry I have retried my tutorial in the evening and swt is not needed because it comes with org.eclipse.ui. I think you have made a mistake in the first part of the tutorial. You should select the checkmark, that your Plugin will contribute to the ui. Then everything should work fine. If you want to try may new way to add shortcuts without eclipse and java knowledge go to http://www.everythingaboutit.eu/2014/07/add-your-own-shortcuts-to-masthead.html
ReplyDeleteHi Ralf, I re-tried the tutorial as well. I did check the "Plugin will contribute to the UI" and in the dependencies section org.eclipse.ui is listed. I still get an error trying to resolve the Program class. If I try importing org.eclipse.swt.program.Program I get errors resolving org.eclipse.swt. Clearly I'm doing something different as the swt classes are not available.
DeleteI may well use your other solution in the long run, but I would really like to know why this is not working.
Hi Terry, i am sorry to hear, that it is not working for you. Can you send me your eclipse project to ralf.petter@gmail.com. Or at least your plugin.xml, so that i can have a look why it is not working as expected.
Deletegreat reading!
ReplyDeleteHi
ReplyDeleteThanks for the great work with this. I am wondering if Terry's issue was solved as I have the same problem resolving Program in the program.launch line?
Thanks
@Duncan You can send me your eclipse project or better a demo workspace where i can reproduce the problem on ralf.petter@gmail.com. I will have a look what the problem is.
ReplyDeleteHello Ralf, is there a 'special' Notes URL for opening the Replication and Sync page?
ReplyDeleteYes of course notes:///ClientBookmark?OpenReplication should do the trick.
ReplyDeleteHi Ralf
ReplyDeleteDo you know where I can find the documentation on what extension points are available for Discover Page ?
I wanted to know if it is possible to add a new tab next to existing ones (What's New, for New Users, Quick Links, etc) and have that new tab opened by default every time Notes Client is launched.
Regards
Tinus Riyanto
Hi Tinus!
DeleteSorry, but i have never customized the Discover Page before. I had a quick look how to modify the discover page and found out that this is a web page which uses dojo for the interactive parts. So your ownly changes to modify this page is to hack the C:\Program Files (x86)\IBM\Lotus\Notes\framework\shared\eclipse\plugins\com.ibm.notes.gettingstarted_9.0.1.20131022-0932 plugin. It contains the source and the icons for the discover page. Another possibility is to change the gettingstarted plugin to replace the default perspective of the discovery page with your own perspective. So you hae full control over the discovery page. But please mention that both solutions are strictly unsupported and maybe you are violating the license terms of IBM.